Monday, December 3, 2018

Graph API Performance

Microsoft Graph API is used to get data from Office 365. It is using as gateway to get more amount of data with optimized amount of time. I will share some tips to increase the performance.


Paging

In some case requested API will return more number of data. In that case we can use paging to fetch data. We need use $top give page limit. If we have multiple pages, Graph will return odata.nextlink. Maximum threshold for $top is 999

For Example: https://graph.microsoft.com/v1.0/users?$top=100

Query Parameters

Instead of getting default properties from API response. We will specify properties which we want to retrieve as well as amount to data. We can use following parameters with API URL,
  • $top
  • $select
  • $expand
  • $filter
  • $format
  • skip
For Example:

https://graph.microsoft.com/v1.0/users?$top=100
https://graph.microsoft.com/v1.0/users?$select=displayName
https://graph.microsoft.com/v1.0/users?$filter=displayName eq John

https://graph.microsoft.com/v1.0/users?$format=json
Note: We can get CSV also. But Reports API URL doesn't support JSON format

https://graph.microsoft.com/v1.0/users?$skip=10

Microsoft has been recommended to use Query Parameter and paging as Best Practice. As well as we have to consider about number of calls to API. MS Graph supports throttling limit for concurrent calls and prevent the over usage.

Thursday, July 5, 2018

Welcome SharePoint 2019

SharePoint 2019 will have a new, modern screens, that will work perfectly for all devices. It will give easy access to people, content and app. You will get more time to work instead of searching for information.

User Experience

SharePoint 2019 will give an innovative user experience, which covers document library and navigation. Office 365 already had this update and it is working fine. Now it is time for SharePoint Server too. User can easily communicate and collaborate with Cloud. These investments include the introduction of Communication Sites, Team News and Modern Team Sites to include Lists and Libraries and in support of broader data mobility the Next Generation Sync Client (NGSC) support for reliable access to documents at anywhere, anytime

Key Features

  • Modern Sites, Pages, Lists and Libraries
  • Team News
  • SharePoint Home
  • Communication Sites
  • OneDrive Sync Client
  • Improved hybrid support and scenarios
  • New Developer options
  • Improved support for Business Process with PowerApps and Flow 

Friday, July 28, 2017

How add value to User field using REST API

As all we know, SharePoint is having People field in list. We can add data for this field from custom webpart. There is lots of way to add listitems like server side (c#), client side (SP Client Context or REST API). We will see how to add value to user field using REST.

In REST, you can't get Proper column name of User Field. For Example, If you are having field with Owner as Column name. REST will not provide the value with Owner column. It will give two properities like OwnerId, OwnerString.

We have to pass the value for OwnerId. So first get the UserID for selected user. Then pass the ID to OwnerId field.


 let Listdata = JSON.stringify({
            "__metadata": { 'type': 'SP.Data.ListItem' },
           
    "OwnerId": 26
        })


How to render People Picker in Client side using Typescript

SharePoint gives provision to get Site Users using People Picker. It will get Groups and People of the site. In a same way we can add people picker in custom webpart. We can easily add this control in Farm solution. But Client side can't add this directly. Let's see the steps to render this using typescript.


declare the followings

declare var SP: any;
declare var SPClientPeoplePicker: any;
declare var SPClientPeoplePicker_InitStandaloneControlWrapper: any;

Then, Initialize the control.

InitializePeoplePicker() {
        var schema = {};
        schema['PrincipalAccountType'] = 'User,DL';
        schema['SearchPrincipalSource'] = 15;
        schema['ResolvePrincipalSource'] = 15;
        schema['AllowMultipleValues'] = false;
        schema['MaximumEntitySuggestions'] = 50;

        schema['Width'] = '100%';
SPClientPeoplePicker_InitStandaloneControlWrapper('managementPeopleDiv', null, schema);
}

Call InitializePeoplePicker() function when all the controls are loaded in the page. So i have called this function on ngAfterViewInit()

Give the placeholder for people picker in HTML side.

<div id="managementPeopleDiv" class="peoplepicker"></div>

That's all build the app and place the JS filesin SharePoint library. 

Thursday, July 27, 2017

Integrating angular app with SharePoint

We can able to integrate angular application with SharePoint. We can get data from SharePoint using REST API. Let's see the steps to integrate this.

Create An Angular APP

Here is the quick steps to create an angular application. Make the Production package using ng build in command prompt. We will get dist folder in project path.

Integrate with SP

We will get 5 js files within dist folder. Copy those files and paste that in any SharePoint library. Commonly we will use Site Assets for storing these kind of dll files. Create a folder in Site Assets to upload those files.

Then Create one page in Site Pages library. And open this page in SharePoint Designer.
Choose Advanced Mode option at top ribbon. Alter the form like below image.
Save the page. Open the page in browser. We will get an output of angular app. That's all.

Friday, May 5, 2017

Converting text to HTML in REACT

In REACT Component HTML tags are not displayed as HTML. It will display with <> tags. To avoid this, we have to use dangerouslySetInnerHTML in div tag.

For Example: <div dangerouslySetInnerHTML={{ __html: YourValue}}></div>

Hosting package and bundles of SPFx

We have seen about webpart creation and getting list items from SharePoint in last two articles. Now we are going see about hosting the packages and bundles of webpart. Click the following URL to touchbase about webpart creation and populating listitems

First set CDN path for bundle reference. We have to upload the dependency files in that folder. It must be a SharePoint library folder. I am creating one folder for this in Site Assets. 
Mention this path in write-manifest.json file which is under config folder.
Path will be like: https://YoursiteUrl/SiteAssests/deploy

If you need to change the properties of package like name, version and zippedpackage. you have to change in package-solution.json file.
We have done all things in solution side. Next we need to create a package using gulp command. 

Open the Command Prompt and go to solution path. Run the below command to get the build.
  • gulp clean (This command used to clean bundles which is created previously)
  • gulp --ship 
  • gulp bundle --ship (This command used to create bundles)
  • gulp package-solution --ship (This command used to make package)
Each command will take some time to execute. We can see the package in SharePoint folder.

Bundles will be created in temp --> deploy folder.
Upload the sppkg file in AppCatalog Site. Above 3 dependency files must be uploaded at CDN path. Webpart will be available in you site once it is uploaded in AppCatalog. We can add this like adding app. You can see the webpart while click the add webpart in the page.

Thursday, May 4, 2017

Get List Items using SPFx

As we already see about SharePoint client side webpart creation. Now will have a look about getting list items using this. Create the client side webpart first. Click here for the steps.

Open the client side webpart in Visual Studio Code. We can able to see all the needed folder over there.
src section is having all files about the webpart. We need to write the logic in tsx file which is under component folder.
We have a render method in that file which is used to display the content. SPFx will give the default content with welcome message. We can remove this and add our content.

Getting List Items

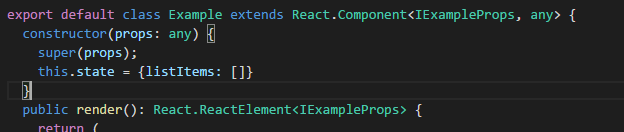
We may use REST API to get content from list. Will see about the steps for SPFx. Create a componentDidMount() method. We have to place our code in this method only. Before that create constructor for initializing the state. 
Now create componentDidMount() method. We may use axios to call REST API. We have to install this using npm. npm command is:

npm install axios --save

import this in header of the tsx file. 
import axios from 'axios';

Place the below code in the method:

 var items = [];
    var apiPath = "/_api/web/lists/getByTitle('listName')/items";
    axios.get(apiPath).then(result => {
      for (var i = 0; i < result.data.value.length; i++) {
        items.push({
          title: String(result.data.value[i]["Title"]),
          desc: result.data.value[i]["Description"] != null ? String(result.data.value[i]["Description"]) : ""
        });
      }
      this.setState({ listItems: items });
    }
The value has been assigned to listItems state. Next we have to render this. Place the below code in render section.

  return (
       <div>
          {
            this.state.listItems.map((lItems, index) => {
              return (
                <div className="divVehicleContent">
                  <h1>{lItems.title}</h1>
                  <div dangerouslySetInnerHTML={{__html: lItems.desc}}></div>
                </div>
              );
            })
          }
        </div>
    );
That's all compile this using gulp command. Run this code in SharePoint site workbench.

Creating SharePoint Client Webpart (SPFx)

Introduction

As all we know SharePoint has introduced Client Side Webpart using SharePoint Framework. Let we see How to create SPX Client Webpart.

SPX Client Webpart

First install yoeman command in your machine globally. Command to install this,

npm i --global yo

Choose your directory and create a webpart using below command.

yo @microsoft/sharepoint

It will ask some parameters to create a webpart.


I chose React JS for client side script. SharePoint gives an option to create in Knockout JS also. Press Enter after giving webpart name and description. It will some time to complete the create process.We will get a success message once webpart has been created.
Go into the path of solution in command prompt itself and give gulp serve command to run the solution. Gulp serve helps to compile and run the webpart using virtual server.
We will get the localhost workbench once webpart has been compiled properly. We have to add our webpart in workbench.
We will get Welcome screen from client webpart once added.
This is the way to add simple client side webpart using SPX. We will see about getting data from sharepoint using this webpart and hosting in next article....

Monday, January 23, 2017

Export and Import SitePages Library in SharePoint

As all we know about SitePages Library in SharePoint. This Library contains both wiki and webpart pages. We can able to export and import this library using powershell script. Here is the powershell script to export library

Export-SPWeb -Identity "http://yoursiteurl" -ItemUrl "/LibraryName" -Path "c:\temp"

Import-SPWeb  -Identity "http://yoursiteUrl" -Path "C:\temp\filename.cmp"

Thursday, September 22, 2016

Queue Job Status shows "Waiting to be processed" and then never completes

We may get this issue while checkin the project. We can't do anything when we got this message. Project sever will allow you to edit the task once the project checked in. 

Solution for this issue:

  • Goto Services
  • Restart Microsoft Project Server Queue Service 2013 
Check in process will work once you refresh it.

Tuesday, July 19, 2016

Create Custom Page Layout in SharePoint 2013

Introduction

As well know about page layout in SharePoint. Now i am going to give steps to create custom page layout.

Design Manager

We will use design manager to create page layout.  Here is the steps
  • Site Settings -> Design Manager
  • Click Edit Page Layouts
  • Click Create a page Layout
  • Give name for page layout ,masterpage to inherit and content type of page
  • Click Ok
  • New page layout will be displayed in Master Page Gallery and Edit Page Layout page

The page layout is in draft state by default. It will not display in page layout dropdown if it is in draft mode. We have to change this as publish version. Then only page will be displayed.

For making changes to page, we have to change the .html file. Download the .html file and make the changes. upload again in master gallery.

Then, Go to Pages Library. Click Pages in New Document Menu

We can find our custom page in page layout section.

Monday, July 18, 2016

Cannot rename old site on restore


Some of us may face this "Cannot rename old site on restore" error while restoring Site in SharePoint. There may several reason to get this type of error. I am going to say about one of the reason to get this error. 

That's Long URL problem with Libraries and List attachments. Some of the URL can't be restored due to long URL. Here is the steps to find those long URL items.

  • Open the Content Database in SQL
  • Right click the DB and select New Query
  • Paste the below query
    SELECT
   CONCAT([DirName], N'/', [LeafName]) AS [FullRelativePath],
   LEN(CONCAT([DirName], N'/', [LeafName])) AS [Length]
    FROM
   [dbo].[AllDocs]
    ORDER BY
    [Length] DESC

  • We will get the Long URL Libraries and List items
  • Then go to that library / list
  • Delete the Library / List from site. It will be in Recycle bin. No need to worry about that
  • Then take new backup of your site and try to restore it
  • Restore the deleted library / list from recycle bin once site has been restored successfully

Thursday, June 23, 2016

To avoid Threshold for list in SharePoint 2013

Introduction

As all we know about Threshold in SharePoint. It is setting limit to view the list items. Threshold for normal user 5000 and 20000 for admins. If particular list exceeds this limit, then items will not be displayed in listview. We have 2 alternate options to resolve this. Let see one after one.

SPList.EnableThrottling

This option normally in true state for every list. If we disable this, List doesn't consider about threshold value. So List view will display items when list items exceeds threshold limit. Execute the below powershell script to disable this option. (But we have to consider about performace while running with huge amount data in list)

$web = Read-Host "Enter site URL : "
$spweb= Get-SPWeb $web
$listname = Read-Host "Enter List Name:"
$list = $spweb.Lists[$listname]
$list.EnableThrottling = $false
$list.update()
Write-Host "Throttling has been disabled..." -ForegroundColor Green

Daily time window for large queries

We are having this option in Request Trotting. We have a timer option in it. We have to set the time when and how long it will be visible. But we have to consider about performance, when we give long duration.


Tuesday, April 19, 2016

visual upgrade failed _catalogs/masterpage/v4.master

We may face this error while doing visual upgrade for migrated site. Here is the steps to resolve this error.
  • Create a new subsite under migrated site
  • Copy the v4master from Site Settings -> Galleries -> Master Pages
  • Then upload this master page in top level site
  • Now visual upgrade will be working fine

Thursday, April 7, 2016

Attach Content Database with SharePoint WebApplication


I am going to explain how to attach a content database with SharePoint Web Application. Follow the below steps to attach DB

  • First Restore the content database in local sql server
  • Open the powershell, first test the db for safer side. Give  Test-SPContentDatabase -name yourcontentdbname -WebApplication "yourwebapplication"
  • It will give some exception if the DB is not attachable with web application
  • Then mount the database,  Mount-SPContentDatabase "yourcontentdbname" -WebApplication yourwebapplicationname
  • It will show the progress of mounting DB
  • We will get 100% notification once DB mounted

Tuesday, March 29, 2016

Device channels in SharePoint 2013

Introduction

Now a days we all using mobile phones to browse things. To render the SharePoint site easily to smart phone and devices, we need a help from Device channels. We can use multiple design for multiple devices. Here i an going to give an idea about Device Channel usage in SharePoint.

Device Channels

It is the part of publishing infrastructure feature in SharePoint. That enables you to render site content, style, images (with same URL) in different devices. HTTP GET  request will send when we accessing the SharePoint site from Smartphones and other devices. This HTTP GET request includes user agent string. This string is having type of device. The device browser will redirect to specific master page based on device substring. For example, if you have a collection of Windows Phone and iPad devices, you can provide each pool with a unique rendering of the SharePoint publishing site by using device channels. Each device channels can be given a different master page and  CSS file to give users a more optimal viewing experience.

Create Device Channel

Here is the steps to create device channel
  • Site Settings --> Look and Feel --> Design Manager
  • Click Create Channel
  • Give required fields like Name, Alias, Device inclusion rules
  • Device Inclusion Rules contains substring of devices like iPhone, iPad, Android
  • We will get master page selection page when channel has been created
  • We can choose the master page for our device
Device Channel will be ordered and listed after the creation. It supports upto 10 devices per site in SharePoint 2013.

Tuesday, March 1, 2016

Publishing Site in SharePoint 2013

Introduction


In SharePoint 2013, We have one of the site template called Publishing Site. An unique feature of this feature is, authoring, approving and publishing processes. The Lists, Library and webparts of this features has created automatically when we create the site.


Create a Publishing Portal

This portal is top level of site collection. Follow the below steps to create publishing portal
  • Central Administration --> Application Management --> Create Site Collection
  • Choose your web application. Enter the title and description of the site collection. Then, Choose Publishing Portal site template at Publishing tab in Template selection
  • Then give Primary and Secondary Site Collection Administrator. Select the Quota Template for storage.
  • Click OK

Publishing Sub-Site

This site will be a sub site of Publishing enabled site collection. The publishing feature will enable automatically while you create under this site collection. Here is the steps to create a publishing sub-site
  • Site Contents of the site collection. And click new Subsite
  •  Give the title, description and URL to the subsite
  • Template selection will show only publishing category site templates. Choose one among them
  • Then give permission level 
  • Click Create
  • The content will not visible to the reader without publish it

Publishing site with approval workflow

The content approval by Admin and Stake holders will enable automatically to this site template.What makes the publishing approval workflow unique is that it’s designed specifically for publishing sites where the publishing of new and updated web pages is tightly controlled. In these kinds of sites, no new content can be published until it has been approved by every approver in the workflow.

Tuesday, February 2, 2016

Drop down style filter in SharePoint List

In SharePoint List, We can get drop down filter if we have more number of data. 


If you want to make this filter while page is loading. Have to add querystring in URL. For Example,

http://servername:port/sitename/list/allitems.aspx?Filter=1

Monday, February 1, 2016

Search Configuration in SharePoint 2013

Introduction

I am going to give an idea about configure search in SharePoint 2013. Follow the below steps,

Step 1:-

Central Administration --> Application Management --> Manage Service Applications

Step 2:-

Explore New drop down at ribbon. Click Search Service Application

Step 3:-

Give the properties in New Search Service Application dialog box. Then, Click Ok

It will show a success message once the configuration is done

Step 4:-

The service will display in Service Application. We will redirect to Search Administration page.


Click Index Reset for safer side

Step 5:-

Click Content Sources to do crawling. Expand the drop down of Content source and click Start Full Crawl.

That's all. Search will work in SharePoint site.