Wednesday, July 16, 2014

Add ListView in SitePages using BinarySerializedWebPart

Introduction

I am going to share my idea about showing listview in sitepages using BinarySerializedWebPart. Let's see the steps for the same.

Save site as Site Template 

At first, Create a site and Create a list which you need to show in site page. Be sure about column names and view your going to show. For Example: If you want to show Name list in your site. Create a Name list in test site with same column. The steps are,
  • Create a list with needed columns (Ex: Name list)
  • Create any views for list if you want
  • Create one sitepage and insert this list webpart in the page
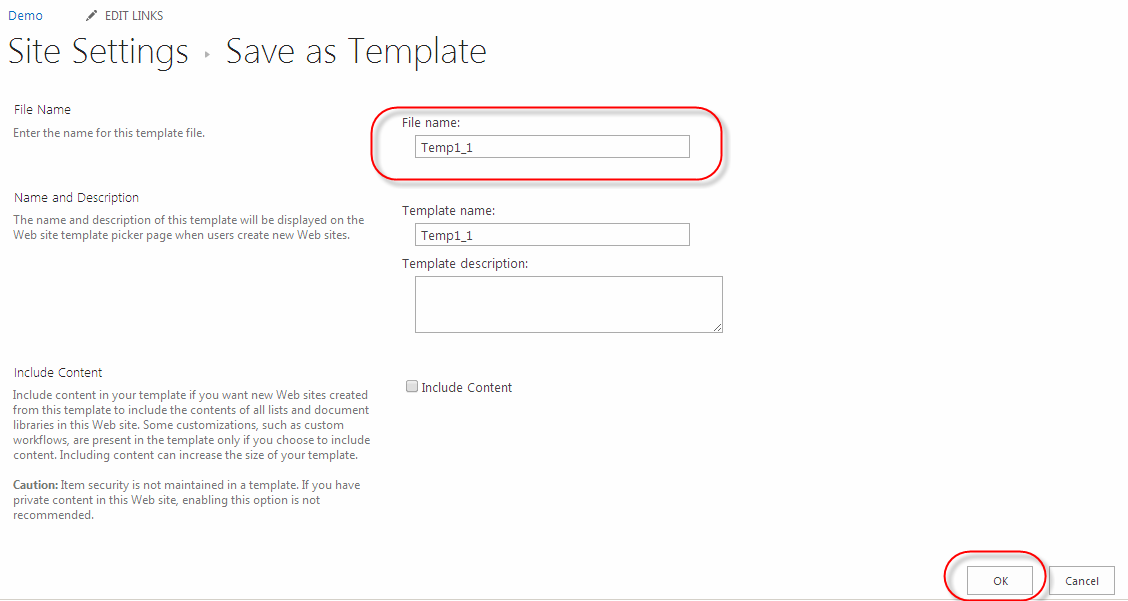
  • Then, Go to Site Settings --> Save site as Template
  • Give the File Name of template and click OK


  • We may get the success message if its done properly


Import Site Template

Go to Solution Gallery and download the template file in your local disk. Then, Import the wsp using Visual Studio. Steps are,

  • Create a SharePoint 2013 - Import Solution Package Project 
  • Choose Farm level  in Security level debugging window


  • Then, Browse the downloaded package and place it in Specify the new project source window and click Next
  • If you want to import particular items. then, select the items in Select item to import window. Otherwise Click Finish (All items has checked by default)
  • It will take sometimes to import the package. We may get the success message once its done. Then Click Ok

Paste BinarySerializedWebPart

Copy the BinarySerializedWebPart from imported solution and paste it on your SitePage's element.xml. Steps are,

  • Go to List Instance module in Solution Explorer, we may find SitePages list there
  • Then, We may get SitePages_1033_STS_doctemp_smartpgs when expanding SitePages list
  • Expand the SitePages_1033_STS_doctemp_smartpgs and open Element.xml


  • In Element.xml, we may find all sitepages with <File> tag.
  • Find the SitePage which is having listwebpart (Ex: I have put listview in test sitepage)
  • Copy the <view> tag of listview fully
  • Paste it in SitePages's Element.xml where you want show this listview
  • Change the WebPartZoneID and WebPartOrder as sitepage have.

  • That's all. Deploy your original solution in farm.  We may see the listview in sitepage where we pasted it.


Tuesday, July 15, 2014

Custom Masterpage reappears in Modal dialog

Introduction

 We might faced the master page problem which is applied to modal dialog also. I am going to share an idea to resolve this issue.

Solution

When we applying custom master page for our site. The master page will apply to modal dialog also.


To avoid this, we need to add s4-notdlg class in our all custom <div> / <table> in master page .

<div class="footer s4-notdlg">

Deploy your solution and check, this issue will get resolved.


Happy Coding .... !!!!!!


Monday, July 14, 2014

Get value of checked row in Listview Webpart

Introduction

I am going to share my idea about getting value of checked row in ListView webpart. I have achieved this using javascript.

Using javascript

After placed the webpart in sitepages. Just go to your sitepages in visual studio. Then add view button or label in that page to trigger the javascript. 

<input type="button" value="view" onclick="ViewCheckedElement()" />

Add the below script at bottom of sitepage or js file you already have.


function ViewCheckedElement() {
var r = $("tr.s4-itm-selected").attr("iid").split(",")[1];
alert(r);
}

This tr.s4-itm-selected class name will be added when we select the row in listview. We may find id of the row iid attribute.


Deploy the solution in your farm. That's all, an alert will come with checked items when you clicked the view button.

Tuesday, July 8, 2014

Ways to add Visual Webpart in SitePage

Introduction

In SharePoint, We have multiple option to add a webpart in sitepages using programmatically. By,

  •  Using Elements.xml
  •  Referring Webpart Assembly
  • Using SPLimitedWebaprtManager 
Lets see one after one.

Using Element.xml

First Create a SharePoint Empty Project using Visual studio. Then, Add Module with name of SitePages. Add a aspx page in SitePages module. After added a visual webpart in the project. We may get three files.


Follow the below steps to add webpart property in sitepages property:
  • Copy the properties from <webParts> to </webParts> in .webpart file. 
  • Then, Go to Element.xml file of SitePages module. 
  • Create <AllUsersWebPart> between particular page's file tag
  • Paste the <Webparts> within <AllUsersWebPart>.
  • Deploy the project to SharePoint site


Referring Webpart Assembly

We have an option to register the webpart in SitePage and use it as normal control. Steps are,
  • Go to particular sitepage
  • Add Register tag at top of the page. Like this
<%@ Register TagPrefix="TestWB" Namespace="Test.TestWebpart" Assembly="Test, Version=1.0.0.0, Culture=neutral, PublicKeyToken=59ae411e05487fd3" %>
  • Use the webpart as normal control in aspx page.
 <TestWB:TestWebPart ID="obj1" runat="server" />. Then, deploy and check in your page.

Using SPLimitedWebaprtManager 

Here, We are going to add a webpart in the page using SPLimitedWebaprtManager. Steps are,

  • Create Event Receiver for Feature
  • Paste the below code on FeatureActivated event
  public override void FeatureActivated(SPFeatureReceiverProperties properties)
{
    SPSite site = properties.Feature.Parent as SPSite;
    using(SPWeb web = site.OpenWeb())
    {
        using(SPLimitedWebPartManager wpManager = web.GetLimitedWebPartManager(page url, System.Web.UI.WebControls.WebParts.PersonalizationScope.Shared))
        {
            YourWebPart webpart = new YourWebPart();
            webpart.ZoneID = "Top";
            webpart.Title = "My Webpart";
            wpManager.AddWebPart(webpart,"Top" , 0);
        }
    }
}

Then, Deploy solution and activate the feature. The webpart will display in the page. Happy Coding... !!!!!


Monday, July 7, 2014

Comment Box in SharePoint 2013

Introduction

Now a days comment is having vital role in all the sites. In SharePoint 2013, We have OOB webpart to have comments. Let we see about that.

Note Board

In SharePoint 2013, We have a NoteBoard webpart to handle the comments. Comments will differ from each page. SharePoint has got the page URL and differentiate the comments among them. Activate the Publishing feature for the site to play with Noteboard.


The Entered comment will be shown below of comment box. NoteBoard will have an option for paging. Paging will work as we have in normal Grid.


Add NoteBoard

Let us see how to add a noteboard in a page. After creation a site page, Click Insert --> Webpart in the ribbon. We will get a pane to choose the webpart. Choose the NoteBoard webpart under Social Collaboration Category.


Then, Click Add. NoteBoard webpart will place in your page. That' all, Page is ready to Comment.