Friday, June 26, 2015

Simple way to Add ListView Webpart in SitePage

We have so many option to add listview webpart in sitepage. Here, I am going to tell one of the simple method.

First create a module for site page. Then create a page under sitepage module. Open element.xml file. We can able to see <File> node of created sitepages. Insert the <view> node with their properties. For Example:

<?xml version="1.0" encoding="utf-8" ?>
<Elements xmlns="http://schemas.microsoft.com/sharepoint/">
  <Module Name="SitePages" Url="SitePages">
    <File Url="test.aspx" Type="GhostInLibrary">
      <View List="TestList" BaseViewID="0" WebPartZoneID="Left" WebPartOrder="0" />
    </File>
    <File Url="test1.aspx"/>
  </Module>
</Elements>


Now Deploy the solution in web application. List view will be displaying in sitepage.

Wednesday, June 17, 2015

Update Farm Account in SharePoint 2013 (After changed the system password)

To update the farm account in SharePoint 2013:
In PowerShell command prompt:

stsadm -o updatefarmcredentials -userlogin domain\account -password password 

Monday, June 15, 2015

Enabling Scheduling for Document Library

Follow the below steps to enable scheduling.


Goto Library Settings in Document Library

Click Versioning Settings
Enable Content Approval. Choose Create major and minor (draft) versions for version history. Then Click ok.

Click Manage Item Scheduling in Library Settings

Enable Item Scheduling and Click ok
We done with settings which is needed to schedule a document. Now we may see how to schedule an item. Upload a new document now.

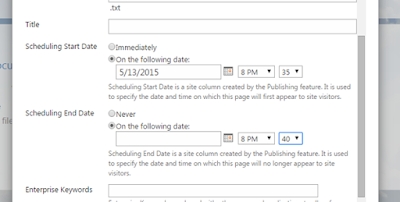
Give the schedule property.


Then approve the document for to schedule it. Publish the major version of document.


Now Approval Status changed as Pending


Approve it


Now, Approval status changed as Scheduled.


Once we login as member of group. There is no document at 8.32 PM. Because we scheduled at 8.40PM


At 8.40 PM. Approval Status of the document changed as Approved. So it will be visible all the user.

Document will be in draft state after scheduled time is over.

That's All !!!!! :) 

Tuesday, June 9, 2015

Set "All day Events" as default in SharePoint Calendar


We have "All day Event" option in SharePoint calendar list. Let me explain about how to set "All day event" by default. First Add a content editor webpart in Newform.aspx of calendar list. Then, Paste the below script in content editor

<script src="http://ajax.googleapis.com/ajax/libs/jquery/1.2.6/jquery.min.js" type="text/javascript"></script>

<script>
$(document).ready(function(){

if (!$('span[title="All Day Event"] > input').attr("checked"))
{
  $('span[title="All Day Event"] > input').click();
}

});
</script>

Save Content Editor and Click Stop Editing in the ribbon. Now we can see the "All Day Event" set for an event by default. 

Monday, June 1, 2015

Add / Remove Event Receiver from SharePoint List

Introduction

As all we know about event receiver in SharePoint. Let me explain how to add and remove this Event Receiver in the list.

Add Event Receiver


SPList list = web.Lists["List Name"];

var eventReceiverName = list.Title + SPEventReceiverType.ItemAdded;

if (list.EventReceivers.Cast<SPEventReceiverDefinition>().All(x => x.Name != eventReceiverName))
 {
var className = "Class name of Event Receiver";
var assemblyName = "Assembly name of dll";
web.AllowUnsafeUpdates = true;
list.EventReceivers.Add(SPEventReceiverType.ItemAdded, assemblyName, className);
web.AllowUnsafeUpdates = false;
}

Remove Event Receiver

 SPList list = web.Lists["List Name"];
 for (int i = 0; i < list.EventReceivers.Count; i++)
{
               if(list.EventReceivers[i].Type.Equals(SPEventReceiverType.ItemAdded))
               {
                   list.EventReceivers[i].Delete();
               }
}