Friday, July 28, 2017

How add value to User field using REST API

As all we know, SharePoint is having People field in list. We can add data for this field from custom webpart. There is lots of way to add listitems like server side (c#), client side (SP Client Context or REST API). We will see how to add value to user field using REST.

In REST, you can't get Proper column name of User Field. For Example, If you are having field with Owner as Column name. REST will not provide the value with Owner column. It will give two properities like OwnerId, OwnerString.

We have to pass the value for OwnerId. So first get the UserID for selected user. Then pass the ID to OwnerId field.


 let Listdata = JSON.stringify({
            "__metadata": { 'type': 'SP.Data.ListItem' },
           
    "OwnerId": 26
        })


How to render People Picker in Client side using Typescript

SharePoint gives provision to get Site Users using People Picker. It will get Groups and People of the site. In a same way we can add people picker in custom webpart. We can easily add this control in Farm solution. But Client side can't add this directly. Let's see the steps to render this using typescript.


declare the followings

declare var SP: any;
declare var SPClientPeoplePicker: any;
declare var SPClientPeoplePicker_InitStandaloneControlWrapper: any;

Then, Initialize the control.

InitializePeoplePicker() {
        var schema = {};
        schema['PrincipalAccountType'] = 'User,DL';
        schema['SearchPrincipalSource'] = 15;
        schema['ResolvePrincipalSource'] = 15;
        schema['AllowMultipleValues'] = false;
        schema['MaximumEntitySuggestions'] = 50;

        schema['Width'] = '100%';
SPClientPeoplePicker_InitStandaloneControlWrapper('managementPeopleDiv', null, schema);
}

Call InitializePeoplePicker() function when all the controls are loaded in the page. So i have called this function on ngAfterViewInit()

Give the placeholder for people picker in HTML side.

<div id="managementPeopleDiv" class="peoplepicker"></div>

That's all build the app and place the JS filesin SharePoint library. 

Thursday, July 27, 2017

Integrating angular app with SharePoint

We can able to integrate angular application with SharePoint. We can get data from SharePoint using REST API. Let's see the steps to integrate this.

Create An Angular APP

Here is the quick steps to create an angular application. Make the Production package using ng build in command prompt. We will get dist folder in project path.

Integrate with SP

We will get 5 js files within dist folder. Copy those files and paste that in any SharePoint library. Commonly we will use Site Assets for storing these kind of dll files. Create a folder in Site Assets to upload those files.

Then Create one page in Site Pages library. And open this page in SharePoint Designer.
Choose Advanced Mode option at top ribbon. Alter the form like below image.
Save the page. Open the page in browser. We will get an output of angular app. That's all.

Friday, May 5, 2017

Converting text to HTML in REACT

In REACT Component HTML tags are not displayed as HTML. It will display with <> tags. To avoid this, we have to use dangerouslySetInnerHTML in div tag.

For Example: <div dangerouslySetInnerHTML={{ __html: YourValue}}></div>

Hosting package and bundles of SPFx

We have seen about webpart creation and getting list items from SharePoint in last two articles. Now we are going see about hosting the packages and bundles of webpart. Click the following URL to touchbase about webpart creation and populating listitems

First set CDN path for bundle reference. We have to upload the dependency files in that folder. It must be a SharePoint library folder. I am creating one folder for this in Site Assets. 
Mention this path in write-manifest.json file which is under config folder.
Path will be like: https://YoursiteUrl/SiteAssests/deploy

If you need to change the properties of package like name, version and zippedpackage. you have to change in package-solution.json file.
We have done all things in solution side. Next we need to create a package using gulp command. 

Open the Command Prompt and go to solution path. Run the below command to get the build.
  • gulp clean (This command used to clean bundles which is created previously)
  • gulp --ship 
  • gulp bundle --ship (This command used to create bundles)
  • gulp package-solution --ship (This command used to make package)
Each command will take some time to execute. We can see the package in SharePoint folder.

Bundles will be created in temp --> deploy folder.
Upload the sppkg file in AppCatalog Site. Above 3 dependency files must be uploaded at CDN path. Webpart will be available in you site once it is uploaded in AppCatalog. We can add this like adding app. You can see the webpart while click the add webpart in the page.

Thursday, May 4, 2017

Get List Items using SPFx

As we already see about SharePoint client side webpart creation. Now will have a look about getting list items using this. Create the client side webpart first. Click here for the steps.

Open the client side webpart in Visual Studio Code. We can able to see all the needed folder over there.
src section is having all files about the webpart. We need to write the logic in tsx file which is under component folder.
We have a render method in that file which is used to display the content. SPFx will give the default content with welcome message. We can remove this and add our content.

Getting List Items

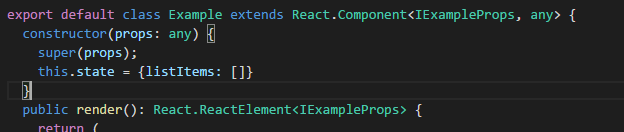
We may use REST API to get content from list. Will see about the steps for SPFx. Create a componentDidMount() method. We have to place our code in this method only. Before that create constructor for initializing the state. 
Now create componentDidMount() method. We may use axios to call REST API. We have to install this using npm. npm command is:

npm install axios --save

import this in header of the tsx file. 
import axios from 'axios';

Place the below code in the method:

 var items = [];
    var apiPath = "/_api/web/lists/getByTitle('listName')/items";
    axios.get(apiPath).then(result => {
      for (var i = 0; i < result.data.value.length; i++) {
        items.push({
          title: String(result.data.value[i]["Title"]),
          desc: result.data.value[i]["Description"] != null ? String(result.data.value[i]["Description"]) : ""
        });
      }
      this.setState({ listItems: items });
    }
The value has been assigned to listItems state. Next we have to render this. Place the below code in render section.

  return (
       <div>
          {
            this.state.listItems.map((lItems, index) => {
              return (
                <div className="divVehicleContent">
                  <h1>{lItems.title}</h1>
                  <div dangerouslySetInnerHTML={{__html: lItems.desc}}></div>
                </div>
              );
            })
          }
        </div>
    );
That's all compile this using gulp command. Run this code in SharePoint site workbench.

Creating SharePoint Client Webpart (SPFx)

Introduction

As all we know SharePoint has introduced Client Side Webpart using SharePoint Framework. Let we see How to create SPX Client Webpart.

SPX Client Webpart

First install yoeman command in your machine globally. Command to install this,

npm i --global yo

Choose your directory and create a webpart using below command.

yo @microsoft/sharepoint

It will ask some parameters to create a webpart.


I chose React JS for client side script. SharePoint gives an option to create in Knockout JS also. Press Enter after giving webpart name and description. It will some time to complete the create process.We will get a success message once webpart has been created.
Go into the path of solution in command prompt itself and give gulp serve command to run the solution. Gulp serve helps to compile and run the webpart using virtual server.
We will get the localhost workbench once webpart has been compiled properly. We have to add our webpart in workbench.
We will get Welcome screen from client webpart once added.
This is the way to add simple client side webpart using SPX. We will see about getting data from sharepoint using this webpart and hosting in next article....

Monday, January 23, 2017

Export and Import SitePages Library in SharePoint

As all we know about SitePages Library in SharePoint. This Library contains both wiki and webpart pages. We can able to export and import this library using powershell script. Here is the powershell script to export library

Export-SPWeb -Identity "http://yoursiteurl" -ItemUrl "/LibraryName" -Path "c:\temp"

Import-SPWeb  -Identity "http://yoursiteUrl" -Path "C:\temp\filename.cmp"