Follow the below steps to enable scheduling.


Goto
Library Settings in Document Library

Click
Versioning Settings

Enable
Content Approval. Choose Create major and minor
(draft) versions for version history. Then Click ok.

Click
Manage Item Scheduling in Library Settings

Enable Item
Scheduling and Click ok

We done
with settings which is needed to schedule a document. Now we may see how to
schedule an item.


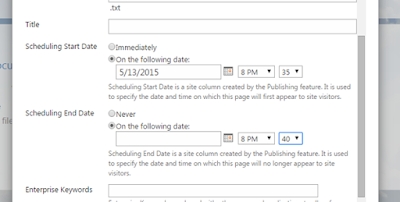
Give the
schedule property.

Then
approve the document for to schedule it. Publish the major version of document.

Now Approval Status changed as Pending
Approve it


Now, Approval status changed as Scheduled.

Once we
login as member of group. There is no document at 8.32 PM. Because we scheduled
at 8.40PM
At 8.40 PM.
Document will be in draft state after scheduled time is over.
That's All !!!!! :)


